Thursday, March 25, 2010

Bravo

Here's a card I made for the music teacher at work. She's been with the school for 20 years!

This is the front of the card.

This is the inside of the card.
Supplies Used: (C1400) Encore stamp set, (Z2105) Black stamp pad, (Z2141) Pansy Purple stamp pad, (X5669) Textured Cardstock Autumn Harvest, (Z578) Corner Rounder, (Z1104) Clear Sparkles, (retired) Just Blooms Autumn Daisy, nestabilities
Pin It

Saturday, March 20, 2010

The Nantucket Bagg

I don't know if I REALLY need it, but this bag is pretty nifty. QVC has a pretty good price but they only sell the 30 pocket tote. The company's website has the other sizes and additional colors. Temptation, temptation!

Pin It

Thursday, March 18, 2010

Embossed Cards

I love simple cards, but for me...they are just not always that simple to make! For example, I was inspired by this post on Ikki's Cuttlebug Cupboard. She has great tips on getting the most out of your Cuttlebug and I really wanted to try what she did with embossing the top part of a side folding standard card in portrait layout (check her blog...she has step by step pictures). I must have gone through three 12" x 12" sheets of textured white paper (aack!) before I finally got a decent card! I was trying to stamp directly onto the front of a folded card and it just wasn't working for me. Everytime I tried, I got a smudged sentiment. When I stamped before folding my card and before embossing my card, it worked much better. Anyway, here are my poor imitations of her technique and cards.


Supplies used: (X5671) White Textured cardstock, (C1340) Aspiration stamp set, (D1187) For Every Occasion, (C1381) Card Chatter - Thank You, (Z2120) Garden green stamp pad, (Z2162) Honey stamp pad, (Z2158) Watermelon stamp pad, (Z697) Round Sponge, nestabilities, Swiss dots embossing folder, Victoria embossing folder

There's just something about embossed white paper that is so elegant and beautiful. I think if I can ever get a whole bunch of these made with different unsmudged (!) sentiments on the bottom, they would make a nice gift set.

Pin It

Monday, March 15, 2010

A Week in the Life - How it Looks in the Album

This was a fun little project and it's nice that it was relatively quick. Even though the rings in the binder album are small, I think it would still fit some more pages so I'm hoping I can do this again in the future and just add the pages here. It'd be a nice way to compare how our routines change as we do.

Here's a glimpse of how it looks in the album.
 
I stamped, "Week in the Life" from the Notice the Details stamp set, directly onto the album's cover. I just wanted to keep it simple so I didn't add any other embellishments to the cover.

The front page just has random shots from around the house (lunch boxes, the fridge, computer screen, toothbrushes, etc.)


Here are some of the layouts from inside the album. Sorry the pictures are small. When I enlarge them, they get somewhat blurry so I've kept them this size.


Supplies used: (Z1141) My Creations 3-Ring Binder, (D1378) December 2009 Stamp of the Month - Notice the Details, (D1286) Today's Date stamp set, (D1222) Tiny Typewriter Alphabet stamp set, (retired) Calendar stamp set, (1385) White Daisy cardstock, (Z2105) Black stamp pad, (Z1034) Ribbon Rounds Black Collection
Pin It

Friday, March 12, 2010

A Week in the Life - Layout

I think it definitely would have helped me to have known how I wanted to lay out my, "A Week in the Life" album in advance. It would have helped me have a better idea of how many pictures and which types of pictures I should take (I know that getting sick played a big role in the amount of pictures on certain days). Although it felt like I was taking a lot of pictures, when I do this again, I will try to take more. I will also try to journal each day instead of all at the end of the week, which is what I did this time. But I do think it all worked out pretty well.

After playing around with the pictures and paper, I decided on a pretty simple layout which I hope to follow for each day. I'm using a CTMH My Creations 3-ring Binder as my album. I typed up my journaling on the computer and printed it out on White Daisy cardstock which I then cut to the same shape as the tabbed paper which comes with the binder. I'm putting my photo collage of nine pictures on the left side of each open layout and stamping the word, "today," on the tab on that page. My photo collage is slightly smaller than 5" x 7" so that there can be a bit of a border around the photos on that page. My journaling goes on the right side of the two page layout with a strip of three additional photos above it. The photos are small, approximately 1.5" x 2" each in the strip above the journaling. I will stamp a letter to indicate which day of the week it is on the tab on this page. Underneath the journaling, I will stamp the date. Then along the left side of this page, I will adhere a black ribbon with white stitching. I like the idea of using the binder because I can easily just add to the album when I repeat this project in the future and have the pages all in one place. I think it'll be interesting to compare and see how things/routines change.

Here's the left side of the two page layout:

Here's the right side of the two page layout:

And here they are together:

Supplies used: (Z1141) My Creations 3-Ring Binder, (1385) White Daisy cardstock, (Z2105) Black stamp pad, (D1222) Tiny Typewriter Alphabet stamp set, (D1286) Today's Date stamp set, (Z1034) Ribbon Rounds Black Collection, (retired) Calendar stamp setPin It

Thursday, March 4, 2010

A Week in the Life

If you read Ali Edwards' blog, you're probably familiar with the, "A Week in the Life," project. If you don't know about it, you can view her posts about the project here. Basically, you document a week in your life and focus on everyday things. I know that at least in my life and the lives of my family, our routine has been changing quite a bit these past few years. Sometimes, it takes a lot of recall for me to remember things that used to be a matter of habit but just no longer exist in our routine now. There used to be a time about 7 or 8 years ago (I can't even remember exactly!) when my son and I would meet my husband at one of the local Rec Centers every Friday after he got off work. He would get there first and start running on the treadmill. By the time we got there, he'd be ready to take our then toddler son to the pool and let me get some exercising time. Then I'd join them and we'd all swim. That was such an integral part of our weekly routine which just vanished as our lives changed and as our family grew bigger.

While I have done a single scrapbook page on our daily routine before and I have done a small scrapbook documenting a month of our lives before, I have never done the, "A Week in the Life Project." Ali blogged about starting the project again in April and I got so excited about doing it myself that I decided to just start...and it happened to be a Tuesday the next day. There was no rhyme or reason for me to start on a Tuesday but when inspiration hits, you go with it! And sure enough, it turned out that it became an atypical week. I got sick with a stomach virus yesterday! This is the first time I have gotten sick since the school year has started. So while I took more than enough pictures for Tuesday, I just wasn't focusing on taking picture while I was sick. I only remembered to give the camera to my husband at about 4pm! So, I'm including some photos that I took on Tuesday, which weren't day specific, for Wednesday. I did consider starting over with another week (hey, I could even start with tomorrow) but after looking at the pictures, I decided to just go ahead and continue.

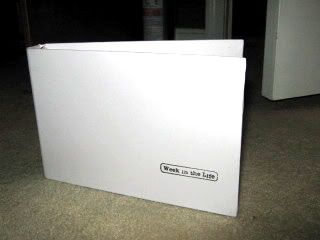
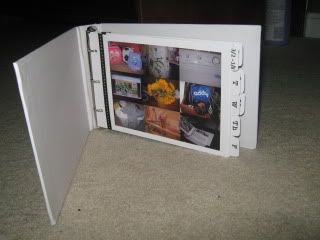
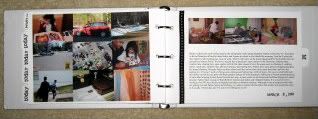
I haven't completely decided on the format yet, but I am leaning towards using CTMH's My Creations 3-ring Binder. I think I'll probably make collages in Photoshop for each day. The photo collages can be on the left side of a double layout and then I can include journaling on the right side.

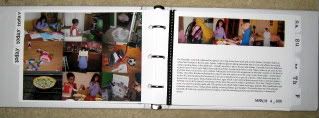
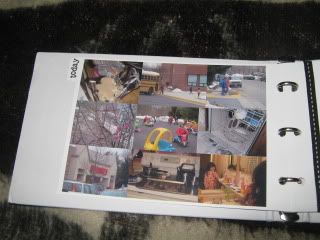
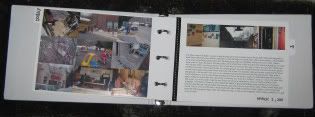
Here is the photo collage for day 1, Tuesday. There was a tree that was actually blooming in the garden at work!

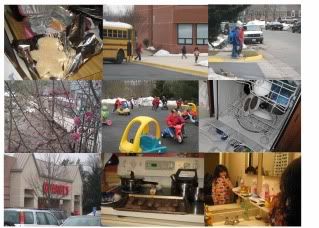
Here is the photo collage for day 2. Note the tray of crackers and ibupforen.

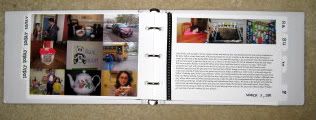
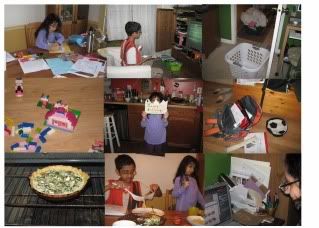
Here is the photo collage for day 3. Again, we only started taking pictures after 4pm since I was mostly resting in the morning but I think it turned out okay. I like the pink legos!

Yes, I know. I need to get a better picture of myself in there! I will work on it now that I'm feeling well again.
Pin It

Monday, March 1, 2010

Pink Owl Card

Whenever I look at my daughter's comforter, I think of stamping! I love all of the adorable nature images on it so I thought I would try to make a card inspired by these images. I normally don't work with these colors so it was a good challenge for me...and it took me a good long while!

Here's a picture of the comforter above.

And here's the card it inspired:
Supplies used: (C1323) Whooo Loves You stamp set, (C1362) You're a Hoot stamp set, (D1372) Grown With Love stamp set, (X7121B) Caboodle Level 2 paper pack, (Z2117) (Z2138) Crystal Blue stamp pad, Orange stamp pad, (Z2108) Brown Bag stamp pad, (Z2338) Orange marker, (X5745) Textured Paper Summer Celebration palette, (Z578) Corner rounder, hole puncher, nestabilities, black acid free pen

By the way, this is a 5" x 7" card. Most of the cards on my blog are standard size, 4.25" x 5.5" but I couldn't fit the tree on a smaller card!
Pin It
Related Posts Plugin for WordPress, Blogger...